Showing posts with label tops. Show all posts

Sunday, January 5, 2014

Christmas pajamas pt 2

More Christmas pajamas for the special little ones in our lives!
 
I made this outfit for my little niece.  To make the candy cane on the shirt, I used red rick rack (the same as on the pants) and twisted sparkly white/clear ribbon around it.  I then pinned the ribbons onto the shirt in the shape of a candy cane, and stitched down the center of the ribbons to connect it to the shirt.
Candy cane pajama top and bottoms
 
 
This is the outfit I made for our handsome little Godson.  To make the onesie I appliqued logos that I cut from the same fabric as the pants.

Appliqued Packer bodysuit and pajama pants
 
Check out the other Christmas pajamas I made this year!

Thursday, January 2, 2014

Christmas pajamas pt 1

I made pajamas for Hubby's niece and nephew for Christmas.  Hubby picked out the materials and ribbon, and was a great sport on our multiple trips to the craft store :)
 
I bought a plain white top and appliqued three owls from the pajama pant fabric onto it.
 
Appliqued owl top
 
I can't remember off hand which pattern I used for the baby/toddler pajamas I made this year, but will look it up and write a review in the future.  I used this pattern for 3 of the 4 pajamas I made this year... but likely won't use it again, at least not without changes.

Owl fabric toddler pajamas
 
I liked the pattern I used for the boys pajama pants, but, of course, my dog literally ate my pattern.  Thankfully it was after my pieces were cut!  I'll look up the information and post a pattern review for it in the future too.

Penguin fabric boys pajama pants
 
Check out the rest of the Christmas pajamas I made this year!


Sunday, July 1, 2012

Refashioned t-shirt (REVERSIBLE & multi-look)

Hubby & I just went through our house and got rid of TONS of old clothes and other stuff.  Knowing my love for refashioning t-shirts, Hubby pulled a handful of old t's aside for me :)

I think this shirt turned out kind of fun, because it is REVERSIBLE and since it has a ribbon for straps, it can be tied several different ways, giving slightly different looks.


Here's the BEFORE:

The shirt was a bit roomy for me to say the least.  Oh, and I'm not sure I should admit this... but there were holes torn in the armpits of it (that probably explains my slightly creeped out face in this picture).

Anyways, here's how I refashioned this shirt:


1) Lay the shirt flat, and place a shirt that fits you well on top of it.  


2) Using the shirt that fits as a guide, cut the t-shirt (that's being refashioned) width to size. 

*Remember to add enough room for seam allowances*
*If the guide shirt has more or less stretch than the shirt you're refashioning, add/reduce your measurements as well*


3) Cut notches for armholes

4) On one side of the shirt (doesn't matter if it's the front or back piece, since it's reversible) cut a v neck (leaving 3-4 inches for each shoulder)

5) If you want to get rid of the logo  sew the pieces opposite of normal (making the previous "right side" of the fabric the new "wrong side"  the logo should be on the inside of the shirt in the end)

6) Turn the fabric at the armhole under and stitch a seam (remember, to make sure you're sewing on the proper side of the fabric if you're hiding a logo)

7) Repeat step 6 with the "v" shape cut out of one piece

8) Sew sides of shirt together, under the arm holes


9) Sew casings on the top edges of each piece (the straight top edge on the uncut side, and each of the 2 shoulder pieces on the side with the v cut)

10) Thread a long ribbon through the casings and tie it together.  There are tons of ways to thread and tie the straps, here are just a few examples:


Straight front with ribbon threaded twice


Straight front with ribbon threaded once

V-neck in front with bows tied on each shoulder

V-neck in front with ribbon threaded across and tied on one side

V cut out in back with simple bow

V cut out in back with ribbon threaded through and tied in front

Straight back with ribbon tied in front

There are lots of other ways to wear the shirt, or instead of ribbon it can have a more nautical look if you tie thin rope as the straps.

Thursday, October 20, 2011

Halloween 2011 - Royal Wedding - Lace on bodice

My wedding day Kate Middleton Halloween costume is well under way! Here's a recap on the making of the petticoat, satin part of the bodice, and skirt.

Now, lets take a look at how the lace part of the top was made.

I based the lace layer of the bodice off of McCalls pattern 6120 instead of attempting it on my own, to prevent damage to the lace from unnecessary alterations.

To do this, I traced the McCalls pattern onto a large piece of paper and made these adjustments:
1) Made the front into 1 piece (a v-neck cut on the fold)
2) Made the back come up higher
3) Lengthened the sleeves
4) Pointed the sleeves at the wrists
5) Cut the back into 2 panels, as it will be buttoned instead

Below is a look at some of the pattern pieces:
(the sleeve pattern is on front)


Here's the front and back panels pinned on the dress form:


Once everything was sewn together (with a zig-zag stitch), I turned the lace inside out and lined it up on the dress form. Then, I pinned 2 darts on the front, making it more fitted.

I sewed the darts in place, then moved on to the sleeves.

The sleeves needed to be taken in a lot:


Fitting a sleeve on yourself is a time consuming task. But, with the sleeves inside out, I slowly pinned where they needed to be taken in.


Here the sleeve fits nicer, but there is still more room than I'd like at the wrist. So, I will likely be adding buttons there later to make it more fitted... we'll see.


Once everything was fitting right I trimmed the fabric close to the seams, and flipped it right side out. I pinned the lace layer over the satin bodice on my dress form and tacked them together at the seams.

Monday, October 17, 2011

Halloween 2011 - Royal Wedding - bodice (take 2)

When I scrapped the bodice discussed in the previous post, I decided to use an actual pattern to get quicker results for my Kate Middleton wedding day Halloween costume.

Luckily, I found McCalls 3635, which is for a 2 piece dress (top and skirt) and was nearly perfect for this costume. The top had the princess seams and zippered back that I was looking for, but the neckline had to be changed, no big deal.


I went straight to my satin to make the top from view A. Since the fabric frayed so easily, I ran fray check around the perimeter of each piece before sewing it together.


I left the neckline the way the pattern showed until I had my lace layer figured out for the bodice.


For a quick link to the first post on making the dress click here.

For ideas on how to accessorize the Royal wedding day look, click here.

Sunday, October 16, 2011

Halloween 2011 - Royal Wedding - bodice (take 1)

As I said before, the process of making my Halloween costume was interesting. I knew right away that I wanted Hubby & I to be William and Kate on their wedding day. I somehow had this brilliant idea that I'd make my own pattern...

I did. And it was time consuming, but worked out alright... until I got rid of the wrong set of pattern pieces that I made for the bodice (that'll happen when you should be sleeping, not sewing) and somehow couldn't revive the muslin I made to make a new pattern.


Here's the bodice I made, before it met it's fate as a scrap piece of fabric:


I made a ton of measurements and cut some muslin for the bodice. Then, I sewed the bodice together & added a zipper.

I tried it on, and using grey thread, basted the muslin in areas that needed to be taken in so I could quickly make adjustments. (I also wrote all over my paper pattern & muslin making notes for additional length, etc.)

Then, I cut the pattern in the lining material & added boning. (not sure if I did it right, never used it before)


I'm not sure exactly what happened, but somehow the above bodice didn't make the cut. Since I couldn't find my pattern again, I pulled out my trusty real pattern stash and found one that could be modified to work.

See how the next bodice was made soon!

For a quick link to the first post on making the dress click here.

For ideas on how to accessorize the Royal wedding day look, click here.

Wednesday, September 7, 2011

Refashioned t-shirt (worn out shirt with hole)

**Don't forget to enter my GIVEAWAY to have a chance to win some printable postcards!! (enter by Sept 9, 2011 at 11:59PM central time)**


I found this old black shirt Hubby gave me to refashion and made it into a quick v-necked tank.

But, I noticed there was a hole in the front of the shirt... I'm not sure that I like the way I covered it up (a more subtle color or different shape maybe nicer?) but here's how it went:


1) As with all shirts I get from Hubby to refashion... there was a big old logo on the front of this shirt. So, I flipped it inside out to have a nice solid shirt to work with.


2) Trace a shirt that fits well and add a seam allowance before cutting the fabric. (remember to take into account how stretchy the fabric from the shirt that fits is compared to the shirt you're cutting... you may want to leave a little extra room)
3) Sew the sides of the shirt back together so that the logo is now on the inside of the shirt
4) Cut the neckline into a v-neck (make sure to remove the tag from the shirt too)


5) If the shirt is worn out like this one... locate all of the holes and determine how to fix them
(I chose to sew a brightly colored ribbon in a random pattern over the hole. A large bow or textured patch of fabric may also be options. Or, you could simply sew the hole shut, depending on the size and such)

I kept the neckline edges raw, but they could easily be turned under and sewn.


Here's a close up of the ribbon sewn on to cover the hole in the shirt:


Monday, August 29, 2011

Tie Dye!

Hubs and I are on vacation, so I thought I'd share some pictures from when my Little (big brothers big sisters) and I tie dyed shirts:

Here's my Little's shirt all full of dye:


Here's my shirt all full of dye:


The instructions on the tie dye package said to wrap the shirts in saran wrap to keep the dye moist... we tried that, but decided it was better to put them in plastic ziploc bags.


8-9 hours later, I rinsed our shirts out and put them through the laundry.

Here's how my Little's shirt turned out:


Here's how my shirt turned out:


I didn't think to look at the fabric contents before we dyed the shirts because the shirt I bought for her was from a stack right next to the tie dye kits. I used an old white shirt of Hubby's that had a stain on it fo myself.

I knew that dye works much better on cotton fabrics and looking at the shirts now it is very apparent.

My old stained shirt was 100% cotton and her new shirt (bought right by the dye) was 50% polyester and 50% cotton. Bummer. Her shirt still turned out really cute, but I would have searched for a 100% cotton shirt for her to use too... guess I shouldn't just assume the craft aisle has the best options in line.

Monday, August 22, 2011

Refashioned t-shirt (pintuck sunburst)

I'm not sure how I feel about this shirt yet... but here it goes:

Before:

1) Flip the shirt inside out to get rid of the huge logo.

2) Find a tank top or shirt that fits well and use it as a guide to make the shirt the correct size (be sure to add a seam allowance!)


3) Cut the sleeves smaller (if desired)


4) Sew the sides of the shirt so the inside of the shirt now has the logo on it.

5) Sew the sleeves back on the shirt.


6) Pleat the sleeves as shown below (this is a top view of the sleeve).


7) Sew the pleat in place.


8) Turn the sleeve edge under and sew in place.


9) Sew pintucks on the right sides of the fabric (I chose to make a sunburst type of pattern, but anything works)


10) Cut the collar off of the shirt (make sure to cut the tag off too)


Tuesday, July 26, 2011

Racerback top

Awhile back I was playing around with some scrap fabric and came up with this top. The neckline has knotted fabric as the detailing on the front. The back has the raw strips of fabric (left over and still connected to the knotting from the front neck) wound and secured around the top.


Purple racerback front


Pretty quick sew, especially with keeping raw edges.
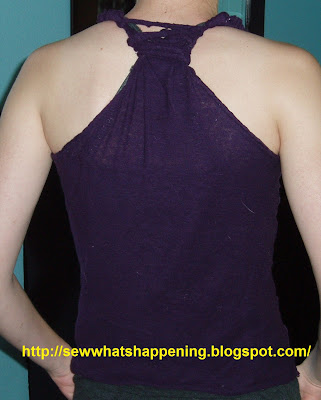
Purple racerback back

Don't forget to check out the sites I link up to by clicking on the tab at the top of the page!

Wednesday, July 20, 2011

textured tube top tutorial

I've been working on beagle proofing our house (yes, again...) and was out of town for several days so my sewing room activity has been light lately. But, I had my embroidery machine looked at while I was gone and everything is alright with it. Hopefully that means I'll bust it out and get back to more embroidery/sewing :)

Now, how to make the textured tube top:


1) Cut fabric as if making a simple tube top, but add about 5" extra length at the top of the front piece

2) Make several horizontal pleats with the excess fabric at the top of the front piece

3) Sew over top of the pleats back and forth several times (I made zig-zags across the entire front) to keep the pleats in place (Kind of like how I made this pillow )

4) Sew front and back pieces of tube top together

That's it! You can finish off the top and bottom edges, but I just left mine raw.

Thursday, July 7, 2011

Refashioned t-shirt (green tank with elastic)

Hubby sorted through his t-shirt collection and rounded up a nice stash he doesn't wear anymore. Then, he gave them to me so I could do some more refashioned t-shirts!

The first shirt I took scissors to was a green shirt (with some lighter more faded areas) with a rather large logo across the chest.

Since I didn't want the logo on the refashioned shirt, I simply turned the shirt inside out. Goodbye logo and hello nice solid green shirt.


The photo above shows the first cuts I made to the shirt. The sides are a little uneven in the picture, but were trimmed more evenly before sewing.

With the NEW right sides together (logo on the outside) I sewed along the two sides of the shirt with a zig zag stitch.

I then cut off the collar of the shirt (and removed the tag)


Now, to finish off the shirt, I simply sewed elastic on the inside of the neck and armholes. I left those edges all raw. Since the edges kind of roll and ruffle a bit, you can see the lighter shades of green on the neck and armholes.