We're at the beginning of wedding season again, which is perfect timing to keep the excitement going for my somewhat large sewing project. I'm sewing a wedding gown!
Who on Earth would trust me to sew such an important dress, you ask? Well, it's actually for me... for Halloween... so it's really not a big deal at all hehe.
Good thing, because I will be the first to admit that I have no clue what I'm doing. I'm going to be totally winging this. (I'll probably get a pattern for Hubby's costume, we'll see though)
But, to help out with making the gown I purchased the book Bridal Couture by Susan Khalje. I'd read several outstanding reviews on it. So far it has been extremely helpful to me too. Unfortunately, at this point in time the book is out of print... so look around hard to find the best deal if you do decide to purchase it.
Pages
▼
Tuesday, May 31, 2011
Friday, May 27, 2011
Cloth diaper snaps
I'm currently on vacation with some of my friends from high school. (actually come to think of it, we really have been friends since elementary & middle school) Anyways... since I'll be away from my computer for awhile, I figured it'd be the perfect time to catch up on some old projects since I won't be making anything new for a week or two.
A couple of months ago, I started making cloth diapers. Here's a look at the first cloth diaper I made. (click on the label "cloth diapers" on the side bar of this blog for more posts on it)
I loved the idea of AIO (all-in-one) cloth diapers and invested in some plastic snaps to make them easily. Here's how a completed diaper looks with the snaps on it:
(the snaps were from KamSnaps.com & the diaper pattern was from clothbaby.org)
Yes, it looks like there are tons of snaps... but bear in mind that is how it is so adjustable and can range in size for almost the entire span a baby will be in diapers.
Here are just a few of the diapers I've finished...
Tuesday, May 24, 2011
Princess Diana exhibit!
Hubby & I just got back from a mini vacation in Kansas City. Why Kansas City? Because of the Princess Diana exhibit they currently have at Union Station. (OK we also did other things Hubby was interested in too ie went to a theme park that I got miserably sick at).
The Princess Diana exhibit was amazing. They showed items from her childhood and throughout her life. The item there that drew the most attention though... her Wedding gown! With the full 25 foot train laid out behind it. When I heard her gown was on display in the U.S. I knew I had to see it. It was stunning. There were also many (18 or so?) of her other dresses on display that were famously known and absolutely beautiful.
I've always loved Princess Diana and would absolutely recommend checking out this exhibit if you do too.
Unfortunately we could not take pictures inside the exhibit. But, we did get one in the hallway before the exhibit started :)
Tuesday, May 17, 2011
Anthro inspired hair accessory: 7 step tutorial
I was glancing through Anthropologie's website the other day and fell in love with pretty much everything I saw... but particularly their hair accessory: Carnation bobbies.
So, I decided to have a go at making a similar styled hair clip.
It's kind of hard to explain the steps in words, so hopefully the diagram helps out. Unfortunately, the fabric I used was pretty difficult to photograph, so none of the pictures I took while making it turned out.
Sunday, May 15, 2011
Yuck! Washing fabric...
I hate pre-washing fabric. I feel so wasteful putting such a small amount into the wash and running a cycle (even if it's an express load) so I generally mix things I know that I shouldn't...
Somehow I have never had a problem in the past... until this one recent incident shown below (click on the pictures below for a larger view)
Hello blue sock monkey feet and blue bird background that was supposed to be tangerine!
When I purchased the blue fabric for Hubby's robe, I was expecting an order from fabric.com to come in the mail any day. So, I actually waited to throw the whole load together.... yeah, I know, dumb! The blue fabric absolutely should have been done separately.
I think I've finally learned my lesson. I ended up washing the two flannels again on their own after they turned colors hoping some of the dye would come out. Looks like I didn't save any water in the long run.
The flannels are still usable... but much less cute than before. (the before pictures were taken from fabric.com)
Too bad this didn't get me out of laundry duty!
Thursday, May 12, 2011
Refashioned t-shirt (asymmetrical tank with bow)
I was folding some laundry and realized I have tons of t-shirts. So, I grabbed one shirt and a pair of scissors and started cutting it up. Here's a little tutorial for a refashioned t-shirt idea:
1) I chose to do an asymmetric, sleeveless, v-neck. So, I cut the shirt accordingly.
2. Then cut the finished end off of the sleeves that were just removed from the shirt.
3. Cut two 1" wide strips from the sleeve used in step 2
4. Take the strips of shirt and pull on them. This makes the wide, normal t-shirt fabric more tube like but still raw (see picture below)
5. Taking one of the stretched strips of fabric, form half of a bow (see below, left)
6. Repeat step 5 and place it on top of the other strip forming a bow
7. Sew the bow together, making sure to catch all layers of the fabric in the bow
8. Cut roughly a 2" wide (about 3-4" long) chunk of fabric leftover from the sleeves. Tie this around the center of the bow to cover the stitches just made. (keep the extra length of the center of the bow to tie onto the shirt later)
9. Stitch all of the raw edges under on the neckline and armholes of the t-shirt
10. Take in the sides of the shirt to make it more fitted
11. Tie the bow on the shirt. (possible locations for bow: top of shoulder on thin strap, front base of thin strap, no bow at all, etc.)
Check out more of my refashioned t-shirts! Click on the label "refashioned t-shirts" or check out some of these links:
11. Tie the bow on the shirt. (possible locations for bow: top of shoulder on thin strap, front base of thin strap, no bow at all, etc.)
Check out more of my refashioned t-shirts! Click on the label "refashioned t-shirts" or check out some of these links:
MORE REFASHIONED T-SHIRTS!
Reversible, multiple look t-shirt
Worn out t-shirt & covering a hole
V-neck tank with straps centered in back
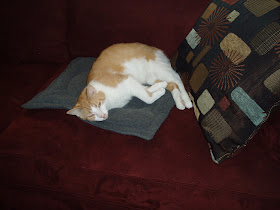
Update on cat bed
Success! Gator loves his new cat mat :)
(click here to check out the previous post on making the cat bed)
Tuesday, May 10, 2011
Cat bed
I finished sewing both McCalls M5538 views that I was making for Hubby and I (posting soon on how mine turned out) and found myself with a lot of leftover gray fleece. Originally I told Hubby that I'd be making Beagle a matching jacket so the three of us could show some style.
Luckily for Hubby (and Beagle) I put the fleece to better use. My cat loves sleeping on our living room couch. He's trying to change the color from red, to orange & white by using all of his energy to shed as much as possible only while laying on the couch. So, I decided to make him a cat mat or cat bed to place on his favorite spot on the couch.
We usually have a junky looking towel stretched across the couch when we don't have company to prevent the couch from collecting cat hair.
Maybe... just maybe... Gator (my cat) will choose to lay on his new cat bed instead of directly on the couch. I know chances are slim, but it was worth a try to me!
Friday, May 6, 2011
McCalls M5538 view A (middle & end stages)
I finished sewing McCalls M5538 View A a few days ago, and Hubby has already gotten a lot of use out of it. I'll be sewing view C for myself sometime in the future, not exactly sure when that will be.
To see the earlier stages of this pattern click here and here.
The picture below shows the top all set except for the sleeves. Which, had I just finished the arm hole edges nicely, it could be a vest instead. It's a very versatile pattern. (View C without the sleeves would also be a nice vest, if that's what you were going for)
(whoa! those sleeves look crazy different lengths... I'm pretty sure they're the same and it was bunched up during Hubby's pose... looks like I need to double check that though!)
I found this pattern to have some confusing parts, and steps that didn't seem necessary, so about half way through sewing this top, I folded up the instructions and just did what made the most sense to complete the project. I also didn't add the pocket (ipod size) on the sleeve, because Hubby didn't think he'd use it.
To see the earlier stages of this pattern click here and here.
The picture below shows the top all set except for the sleeves. Which, had I just finished the arm hole edges nicely, it could be a vest instead. It's a very versatile pattern. (View C without the sleeves would also be a nice vest, if that's what you were going for)
Hubby so kindly models his new top:
(whoa! those sleeves look crazy different lengths... I'm pretty sure they're the same and it was bunched up during Hubby's pose... looks like I need to double check that though!)
I found this pattern to have some confusing parts, and steps that didn't seem necessary, so about half way through sewing this top, I folded up the instructions and just did what made the most sense to complete the project. I also didn't add the pocket (ipod size) on the sleeve, because Hubby didn't think he'd use it.
Wednesday, May 4, 2011
McCalls M5538 top A (first stages)
Here's a look at McCalls M5538 view A in the early stages. (just past the addition of the zipper)
The picture above is of the inside of the top. Piece 9 has to be sewn onto the 2nd cut of the collar piece (lining up the markings) Then, the two collar pieces are attached (step 8) and so on and so on.
This pattern looks pretty easy and does not involve many pieces, but I definitely had to stare at it for awhile to figure out a couple of steps. I wasn't too supprised though, because before starting this pattern I had read several reviews where others had difficulty with a few steps of the process.
Step 7 was what slowed me down. I couldn't figure out how the front facing was supposed to go onto the collar. (I'm not sure if this was the same problem other reviewers had or not)
I think I was having one of those moments, where I just couldn't think anymore... went to bed, and magically it made sense the next day. Here's a look at how it went (assuming I did it correctly):
The picture above is of the inside of the top. Piece 9 has to be sewn onto the 2nd cut of the collar piece (lining up the markings) Then, the two collar pieces are attached (step 8) and so on and so on.
Monday, May 2, 2011
Fabric for awhile...
My most recent order from fabric.com arrived the other day, here's what's in store for my future projects:
The charcoal fleece in the middle is first in line. I ordered 4 1/2 yards of it to make both a top for Hubby and a jacket for me. Here's a previous post I did showing the pattern pictures of the top/jacket.
The other fabrics are all meant to become tops of some sort for me. I have a McCalls pattern that I want to try on at least one of those fabrics, but we'll see about the rest. (I kind of want to wing it on the others)
Finally, the green fabric on the right side of the picture... it's not at all what I was expecting. I'm torn if I like it or not, but I think that will be dependent of the style of top it becomes (?)
Sunday, May 1, 2011
Knitting Needles: Set 1 (baby blanket) update
Here's a look at my first post about the baby blanket I'm knitting.
And, here's how it looks at this point in time:
I've got a looooong way to go yet, but it has been pretty smooth sailing now that the pattern has formed. Much easier/less frustrating than when I first tried starting it and had to undo the blanket over and over again.